
Migrating Orders to Variants
When you add variants to a product that already has orders, customers who purchased before the variants existed exist outside your variant structure. This article explains why that matters and how to move those customers onto the right variant using the self-service migration tool.
Why This Matters
Variants let you control which downloadable files each customer receives based on what they purchased. But customers who ordered your product before variants were introduced aren't associated with any variant — which means they have access to all files attached to the product, regardless of how your variants are structured.
If you want to limit legacy customers to only the files appropriate to a specific variant (for example, because you've added a higher-tier version with additional files), you need to migrate them.
Migration is not required, but if file access control matters for your product, it's an important step to take.
What You Can and Can't Do
The migration tool moves all pre-variant customers as a group to a single destination variant or to move customers of one variant to another variant. It is not possible to migrate a subset of customers, split them between multiple variants, or handle them individually. Your only options are to migrate all of them to one variant or to leave them as-is.
When to Migrate
You should consider migrating past customers any time you add variants to a product that already has orders. The most common scenario is converting a single-version product into a tiered product (for example, adding Basic and Pro variants). In that case, you'll typically want to create a variant that represents your original product and migrate all pre-variant orders to it.
How to Migrate Past Customers
Step 1: Add Variants to Your Product
If you haven't already, add variants to your product. Make sure you've created a variant that represents the appropriate tier for the customers you plan to migrate before proceeding.
Step 2: Navigate to Your Product
Go to superhivemarket.com/creator/products. Find the product in your list and click the orange View button in that product's row.

Step 3: Open the Migrate Variants Tool
Scroll down to the Variations section of the product detail page. If variants have been added, you'll see a table summarizing each one. Below that table is a subsection labeled Migrate Past Purchasers, which contains a Migrate Variants button. Click it to open the migration modal.
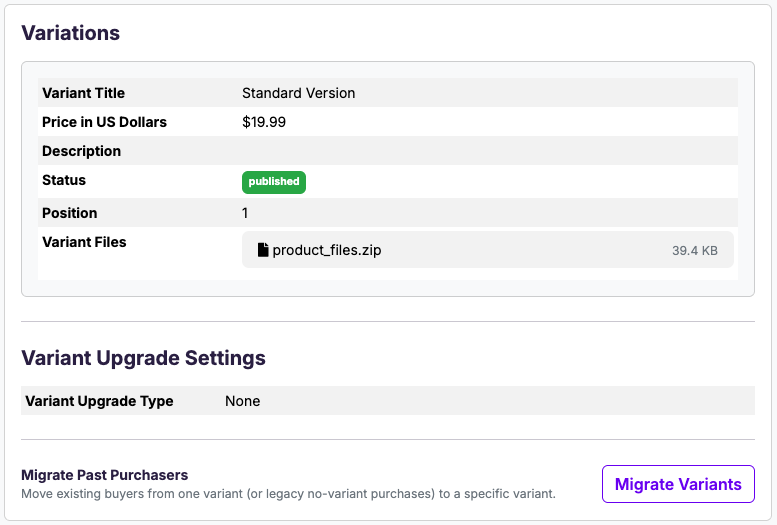
Step 4: Select the From and To Variants
The migration modal contains two dropdowns:
- From variant — Select the source. For customers who purchased before any variants existed, choose No variant.
- To variant — Select the variant you want those customers moved to.
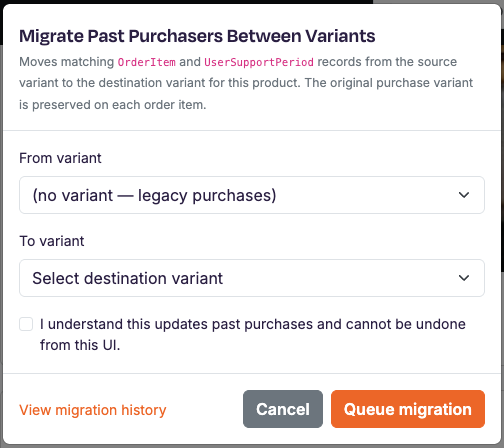
Step 5: Acknowledge and Queue the Migration
Because this action cannot be undone, you'll need to check the acknowledgment box before proceeding. Once checked, click Queue migration.
You'll be taken to a summary page showing the details of the queued migration. The page does not refresh automatically — reload it manually to check on progress. Once the migration is complete, the page will display the order records that were updated. Migrations involving a large number of orders may take some time to finish.
What Customers Will See
After migration, customers will see only the download files associated with the variant they were moved to. Any files that were previously accessible to them but are not part of that variant will no longer appear on their downloads page.
Viewing Past Migrations
To review previous migrations, click the View migration history link at the bottom of the migration modal. This will take you to a page listing all past migrations for your account.
Need Help?
If you run into any issues during the migration process, contact our support team and we'll be happy to assist.